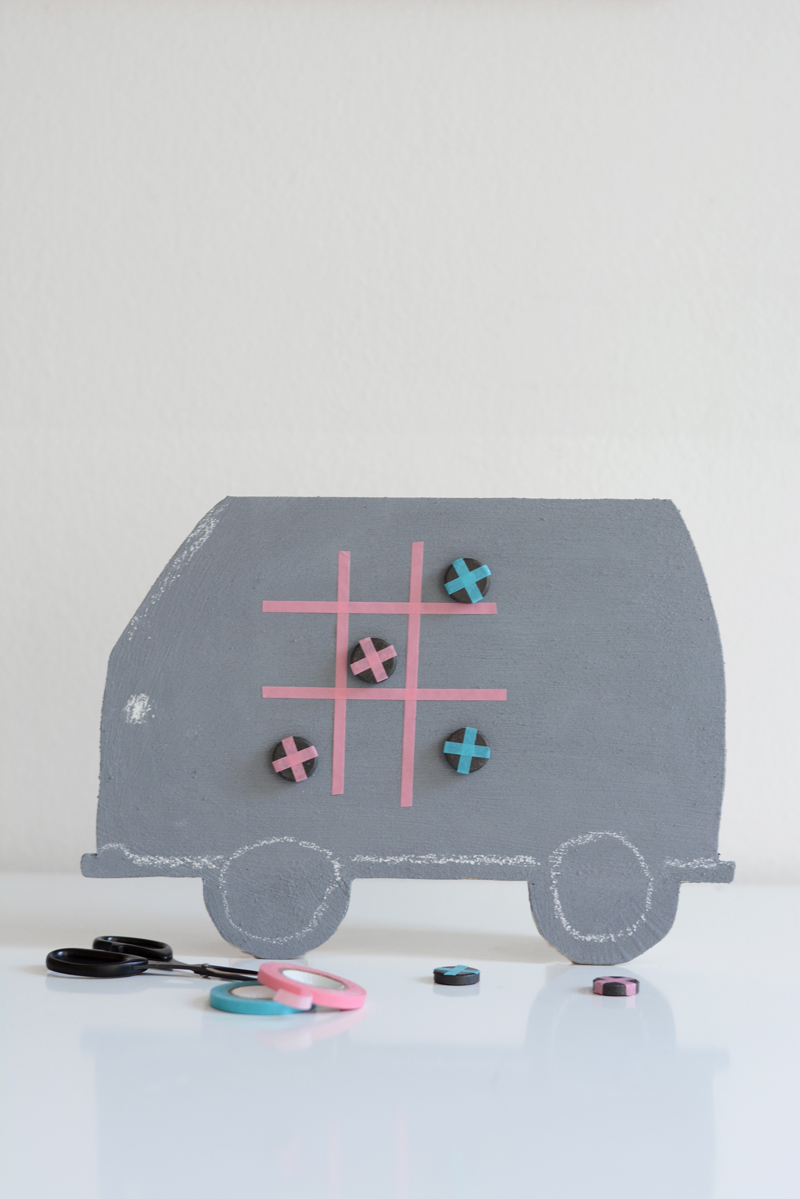
DIY for Kids: Spieltafel für lange Autofahrten/Games Board (Sponsored by Volkswagen)
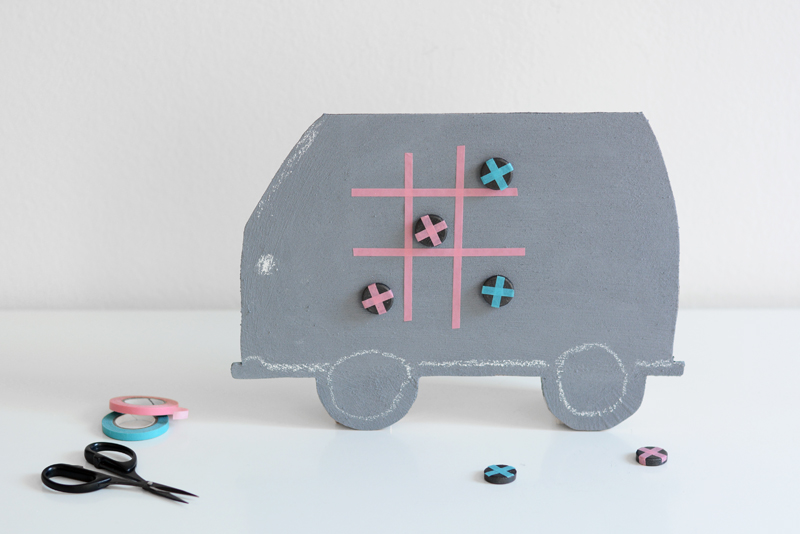
Car journeys can be fun – if you’re behind the wheel. But if you’re just going along for the ride, they can get a bit boring. Children in particular often don’t know how to pass the time on long car journeys. So we thought up something that might help: a small, home-made games board. Using a little magnetic paint, some washi tape and a few magnetic counters, you’ll be able to make a board for a wide variety of games such as noughts and crosses, four in a row and nine men’s morris. What’s really great is that the board is magnetic, which ensures nothing will shift around or fall off accidentally. In short, it’s perfect for car journeys.
Autofahren kann – sitzt man selbst hinterm Steuer – richtig viel Spaß machen. Ist man jedoch nur Beifahrer, kann es auch ganz schön langweilig sein. Vor allem Kids wissen bei langen Autofahrten oft nicht, was sie mit der Zeit anfangen sollen. Wir hätten da aber eine Idee: Eine kleine, selbstgestaltete Spieltafel. Mit etwas Magnetfarbe, Washi Tape und magnetischen Spielfiguren kann man so ganz einfach die verschiedensten Spiele spielen, wie beispielsweise „Tic Tac Toe“, „Vier gewinnt“ oder „Mühle“. Das tolle dabei: Dank dem magnetischen Feld kann nichts runterfallen oder verrücken. Also perfekt für Autofahrten.
Spieltafel
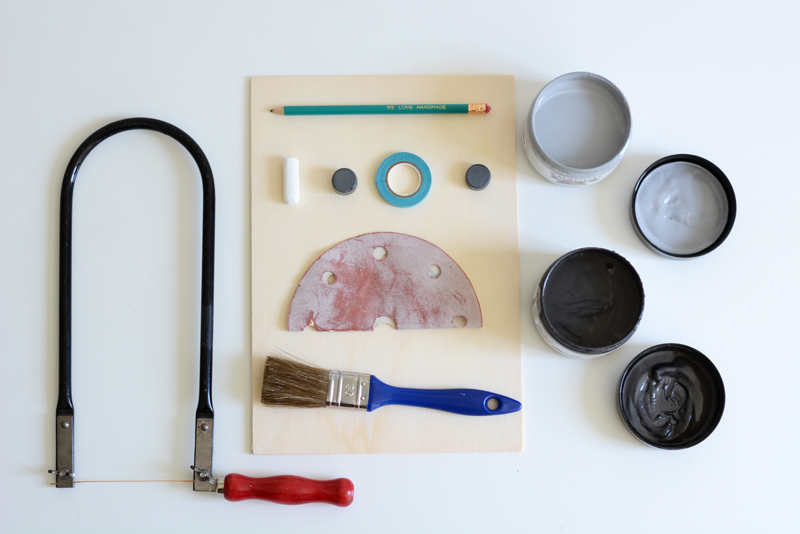
Ihr braucht:
Sperrholzplatte in A4 (3mm dick)
Laubsäge
Schleifpapier
Bleistift
Magnetfarbe und wahlweise Tafelfarbe
Pinsel
Washi Tape
Magnete
Kreide
unsere Bus-Vorlage
DIY for kids: games board for long car journeys (post sponsored by Volkswagen)
You will need:
An A4 sheet of plywood (3 mm thick)
A fretsaw
Some sandpaper
A pencil
Magnetic paint and (optional) blackboard paint
A paintbrush
Washi tape
Magnets
Chalk
Our camper template
So geht’s:
Druckt euch zunächst unsere Vorlage für den Autobus aus. Schneidet die Vorlage aus und zeichnet die Silhouette auf eure Sperrholzplatte. Bereitet anschließend eure Laubsäge vor. Achtet beim Einspannen der Laubsäge darauf, dass die Sägezähne des Sägeblattes nach unten, also zum Griff, zeigen und das Sägeblatt gut gespannt ist. Drückt dafür beim Einspannen die Säge einfach etwas zusammen. Für das Sägen geht ihr am besten in die Werkstatt oder ins Freie. Denn wo gesägt wird, fallen auch Späne.
What to do:
First print out our camper template. Then cut out the shape and draw round it onto your sheet of plywood. Next get your fretsaw ready. When you’re fitting the blade into the saw, make sure the teeth of the blade point outwards, and downwards towards the handle, and that the blade is taut. To make sure of this, simply press the top and bottom arms of the saw gently in towards one another while fitting the blade. It’s best to do the sawing in a workshop or outdoors, since you’ll create sawdust.
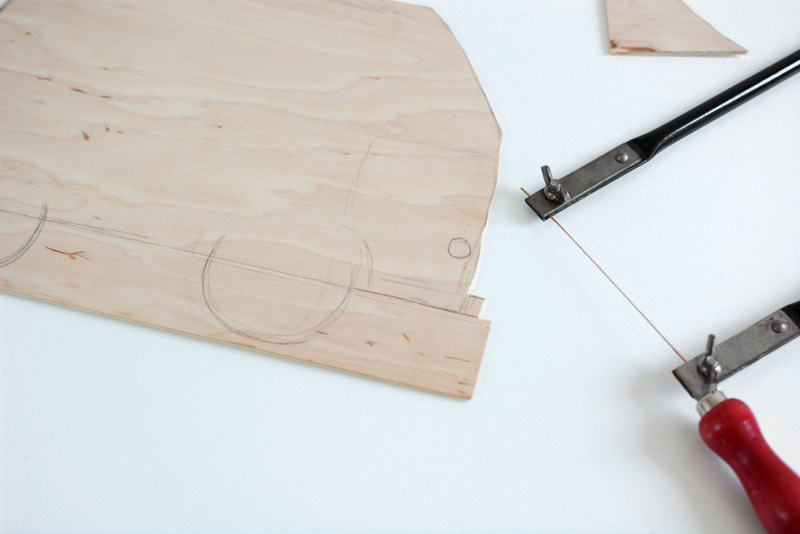
Sägt mithilfe eurer Laubsäge den Autobus aus. Zunächst die langen, eher geraden Flächen und danach erst die runden Reifen. Sollten die Flächen nicht komplett rund oder gerade werden, ist das gar nicht schlimm. Denn wenn ihr mit dem Sägen fertig seid, könnt ihr die Kanten mit Schleifpapier bearbeiten und bei Bedarf ein bisschen begradigen oder abrunden. Kleine Fehler können so behoben werden und Holzsplitter werden ebenfalls entfernt.
Use the fretsaw to cut out the camper shape. Saw the longer, straighter sides first, followed by the rounded tyres. If the sides don’t turn out exactly straight or the tyres exactly round, no problem. When you’ve finished sawing, you can sand down the edges using the sandpaper – so you can straighten them up or round them off a little if you need to. That way you can correct little mistakes and remove any splinters.
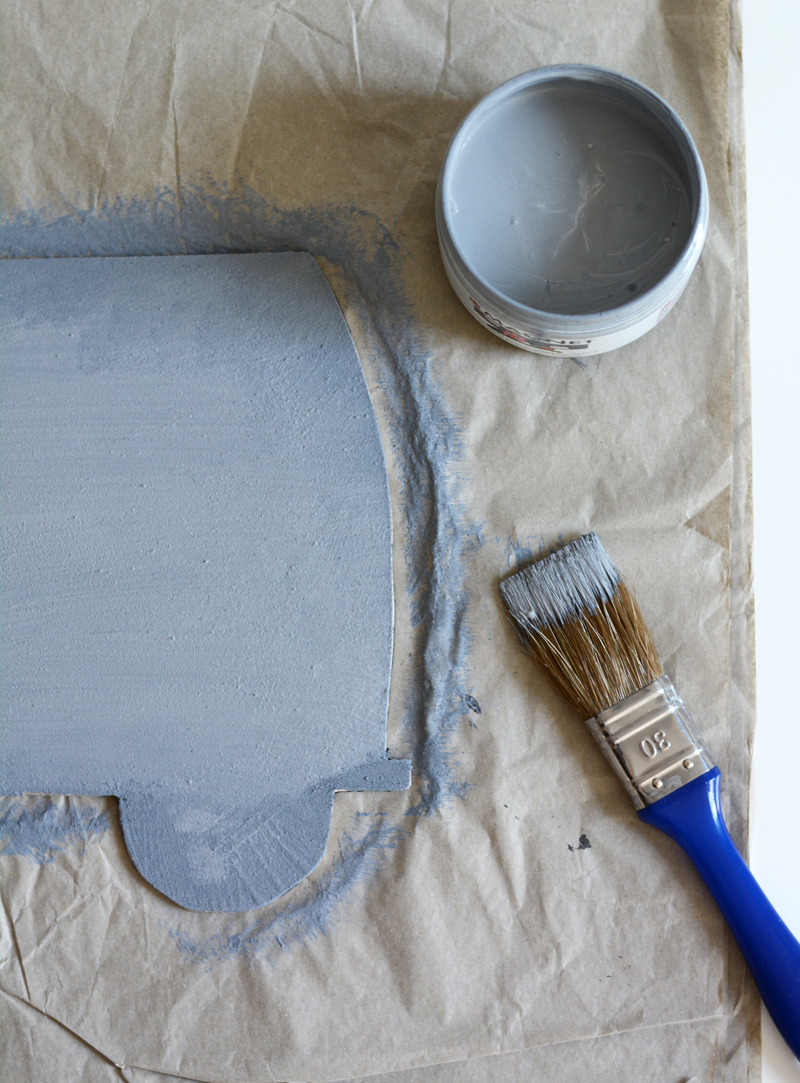
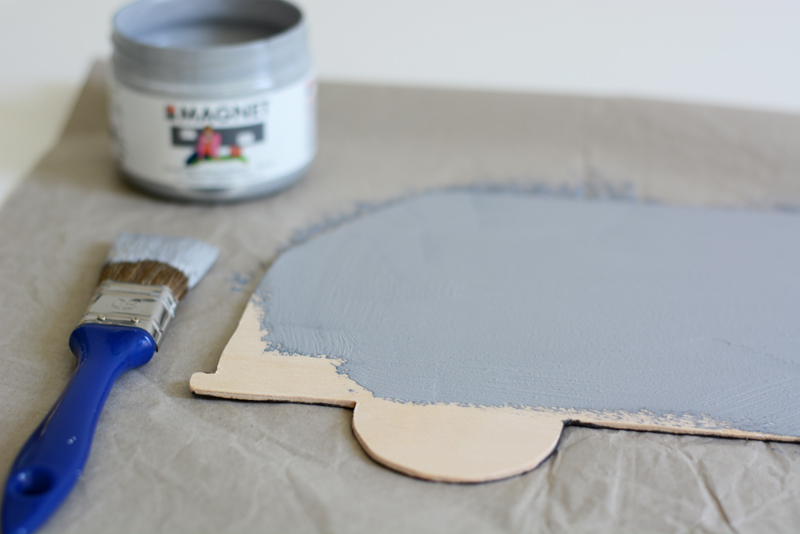
Sobald die Form euren Ansprüchen entspricht, könnt ihr sie mit etwas Magnetfarbe bemalen. Lackiert euren Autobus am besten mit mindestens drei Schichten (wir haben sogar fünf Schichten gestrichen), damit die Magnete später gut halten. Die Magnete könnt ihr, wenn ihr mögt, mit Tafelfarbe lackieren.
As soon as you’ve got the shape you want, you can start applying the magnetic paint. It’s best to apply at least three coats of paint to your camper (we applied five), as it’ll help the magnets to stick better. You could paint the magnets with blackboard paint if you like.
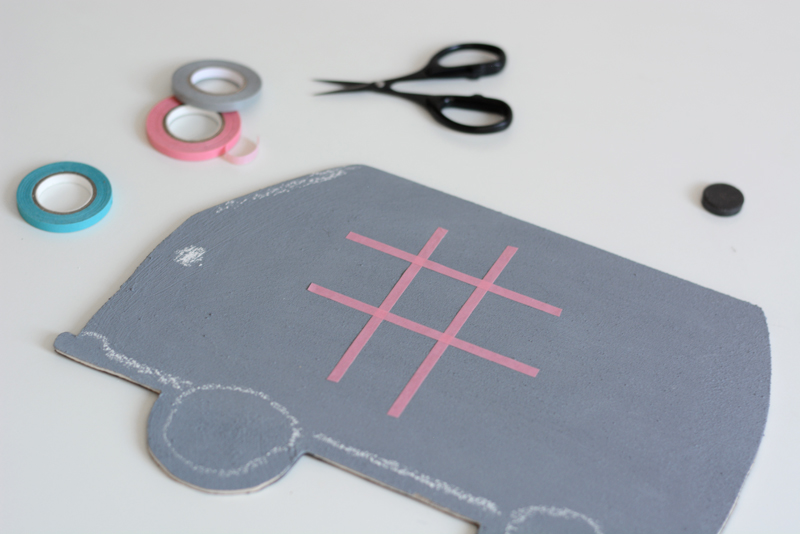
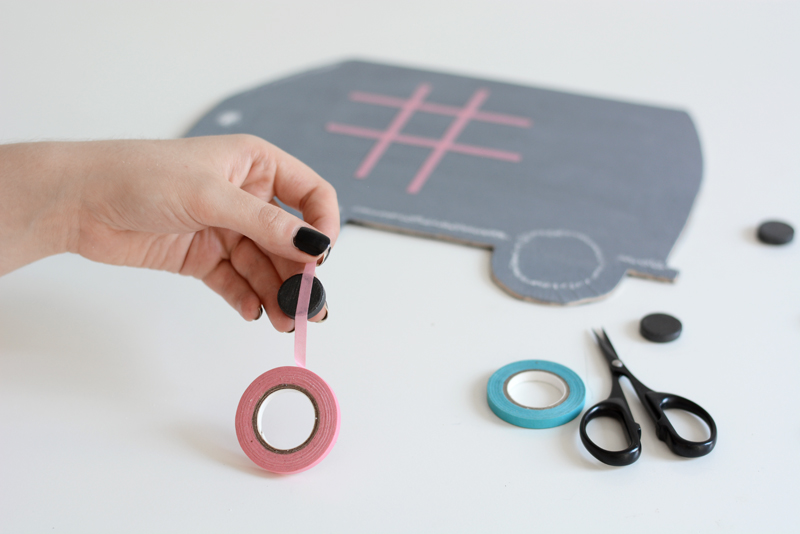
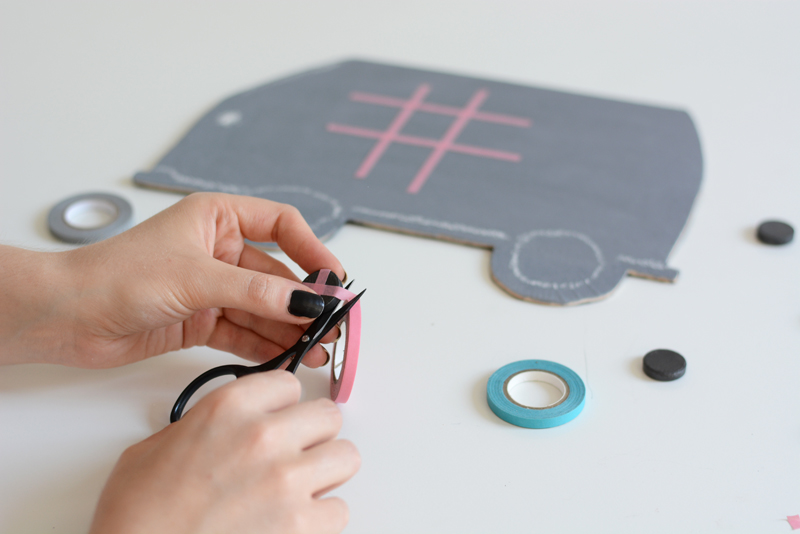
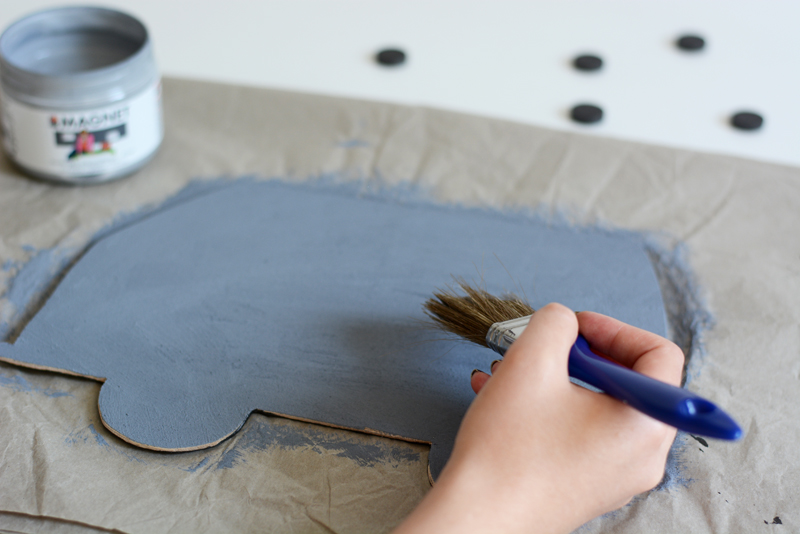
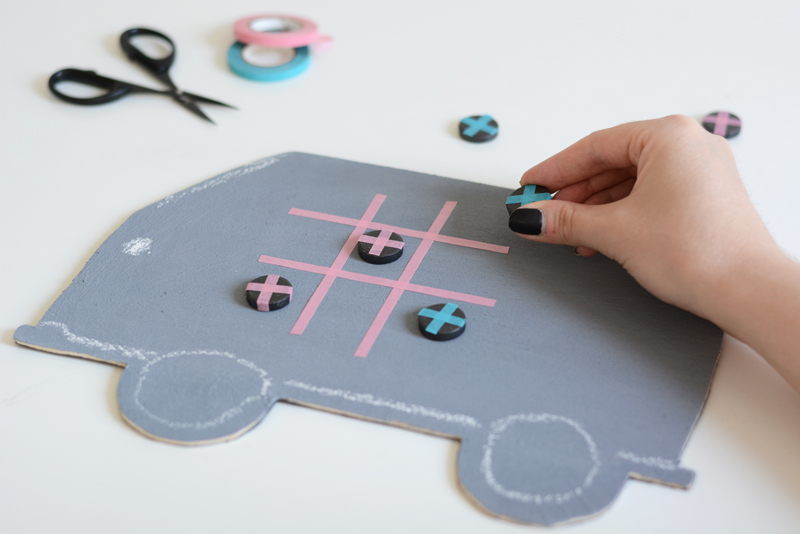
Wir haben die Tafel im Grauton der Magnetfarbe gelassen, ihr könnt sie aber natürlich auch noch mit einer Farbe eurer Wahl überstreichen. Nun könnt ihr mit einem dünnen Washi Tape euer Spielfeld aufkleben. Die Magnete, die eure Spielfiguren darstellen, könnt ihr entweder mit Kreide bemalen oder ebenfalls mit buntem Washi Tape bekleben. Sobald das alles erledigt ist, könnt ihr auch schon mit dem ersten Spiel starten. Wir haben uns für eine Runde „Tic Tac Toe“ entschieden.
We left the board in the colour of the magnetic paint (grey), but you could of course paint it in a colour of your choosing. Now you can use thin washi tape to mark out your game board. As for the magnets you’re using as counters, you can either colour them in using chalk or stick coloured washi tape on them. Once you’ve done all that, you can start playing. We played noughts and crosses first.
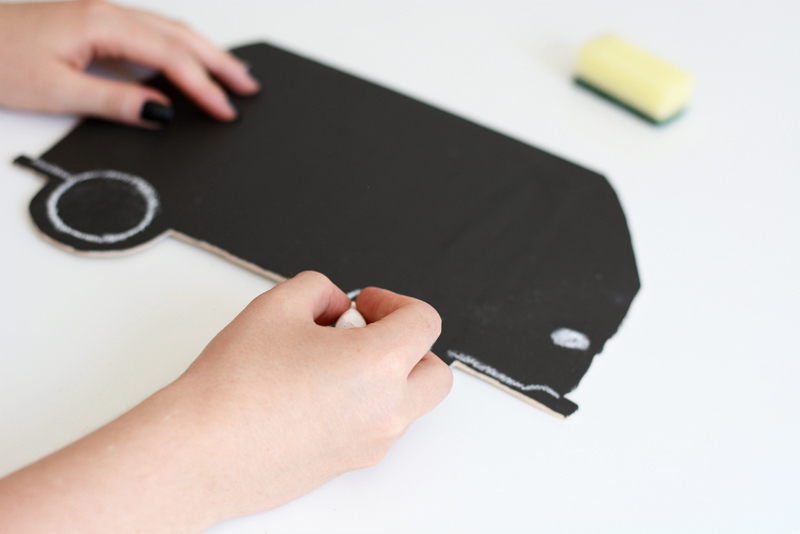
Wer seinen Kids noch mehr Abwechslung bieten möchte, kann die andere Seite des Autos übrigens mit Tafelfarbe bestreichen. Hier am besten zwei Schichten kreuzweise auftragen. So kann die Tafel nicht nur für verschiedene Spiele genutzt werden, sondern auch zum Schreiben oder Zeichnen. Eine super Sache!
To provide a bit more variety, you could also paint the other side of the games board using blackboard paint. If you do, then it’s best to apply two coats at right angles to one another. Once it’s done, you can use one side for drawing and writing and the other for games. What a brilliant camper!
Wer übrigens auf der Suche nach weiteren tollen und kreativen DIY-Ideen rund um das Thema Reisen und Auto ist, sollte unbedingt auch beim Pinterest-Gemeinschaftsboard „DIY Bloggers for Volkswagen“ von Volkswagen vorbeischauen. Dort findet ihr nämlich nicht nur unser DIY-Tutorial, sondern auch ganz viele andere kreative Ideen großartiger BloggerInnen. Die natürlich Lufterfrischer für’s Auto werden wir auf jeden Fall selbst mal nachmachen!
If you’d like more great, creative DIY ideas about travel and car journeys, you should visit Volkswagen’s Pinterest community board ‘DIY Bloggers for Volkswagen’. You’ll find not only our DIY tutorial, but also a great many other creative ideas by cool bloggers. We’re definitely going to try out the natural in-car air fresheners!

Konzept/Designed by: we love handmade
DIY & Fotos/DIY and photos: Petra Gschwendtner
Sponsored Post: Dieses DIY entstand in Zusammenarbeit mit Volkswagen. | Sponsored post: This DIY was produced in association with Volkswagen.